
カスタムフィールドに入力したURLから、スクリーンショットを生成して画像を表示させる方法をご紹介いたします。
例えば、Webサイトの実績を投稿する場合などに、サムネイル画像として活用したりできます。
カスタムフィールドに入力したURLからスクリーンショットを生成する方法
WordPress.comが提供しているmshotsというAPIを使えば簡単にスクリーンショットを生成できます。
以下のように、imgタグのsrcでURLや横幅/高さを指定するとスクリーンショットが取得できます。
<img src="https://s.wordpress.com/mshots/v1/{URL}" alt="">
<img src="https://s.wordpress.com/mshots/v1/{URL}?w={width}&h={height}" alt="">
この機能を利用してWordPressの投稿一覧や投稿詳細にスクリーンショットを表示させます。
まずは、functions.phpや自作プラグインに以下のコードを記述して、スクリーンショット取得を関数化します。
function get_url_thumbnail($post_id = null) {
  if (!$post_id) {
    $post_id = get_the_ID();
  }

  $data = [
    'thumbnail_url' => '',
    'width' => 0,
    'height' => 0,
  ];

  $url = get_field('url', $post_id); // カスタムフィールド名
  $data['width']  = 1000; // 生成するスクリーンショットの横幅
  $data['height'] = 628; // 生成するスクリーンショットの高さ

  if ($url) {
    $data['thumbnail_url'] = 'https://s.wordpress.com/mshots/v1/' . urlencode($url) . '?w=' . $data['width'] . '&h=' . $data['height'];
  }

  return $data;
}
“url”というカスタムフィールドに入力されたURLと横幅/高さを「https://s.wordpress.com/mshots/v1/」の後ろにつなげて返す関数です。
そして、表示側では、以下のように記述します。get_url_thumbnail()でスクリーンショット用のURLを取得し、imgタグにセットしています。
<?php
$thumbnail = get_url_thumbnail();
if ($thumbnail['thumbnail_url']):
?>
  <img src="<?php echo esc_url($thumbnail['thumbnail_url']); ?>" alt="<?php the_title(); ?>" width="<?php echo esc_attr($thumbnail['width']); ?>" height="<?php echo esc_attr($thumbnail['height']); ?>" loading="lazy">
<?php endif; ?>
get_url_thumbnail(123)というように、投稿IDを指定して取得することも可能です。上記ではIDは未指定なので、ループ内や投稿詳細で参照している投稿からカスタムフィールドの値が取得されます。
これでカスタムフィールドに入力されたURLからスクリーンショットを取得して、投稿一覧や投稿詳細に表示させることができます。
1つ注意点があって、スクリーンショットは勝手に取得してくれるわけではなく、初回アクセス時に取得されます。
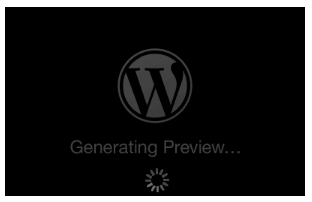
そのため、初回アクセス時は以下のように「Generating Preview…」という画像生成中のプレースホルダーが表示されます。数秒待ってからリロードするとスクリーンショットが表示されます。
画像を設置しているページにアクセスせずにスクリーンショットを自動取得させる方法
初回アクセス時はプレースホルダーが表示される仕様ですが、あまりプレースホルダーを表示させたくない場合もあると思います。
その場合は、functions.phpや自作プラグインに追加するコードを以下のように変更することで、裏でスクリーンショットを自動取得するようにできます。
“works”という投稿タイプ名を想定しています。WP_Queryの投稿タイプ名やsave_post_worksフックは適宜変更してください。
/**
 * mshots用の画像URL
 */
function build_mshot_url($url, $w = 1000, $h = 628) {
  return 'https://s.wordpress.com/mshots/v1/' . urlencode($url) . '?w=' . $w . '&h=' . $h;
}

/**
 * スクリーンショット生成完了を判定するためのハッシュを学習
 */
function ensure_mshot_placeholder_hash_learned() {
  if (get_option('mshot_placeholder_md5')) {
    return;
  }

  $probe_target = add_query_arg('_mshot_probe', wp_generate_password(12, false), home_url('/'));
  $probe_url = build_mshot_url($probe_target);

  $response = wp_remote_get($probe_url, [
    'timeout' => 5,
  ]);

  if (is_wp_error($response) || wp_remote_retrieve_response_code($response) !== 200) {
    return;
  }

  $body = wp_remote_retrieve_body($response);
  if (!$body) {
    return;
  }

  update_option('mshot_placeholder_md5', md5($body), false);
}
add_action('init', 'ensure_mshot_placeholder_hash_learned');

/**
 * mshots URLの生成が完了しているかどうかを判定
 */
function check_mshot_completed($mshot_url, $timeout = 10) {
  $response = wp_remote_get($mshot_url, [
    'timeout' => $timeout,
  ]);

  if (is_wp_error($response) || wp_remote_retrieve_response_code($response) !== 200) {
    return false;
  }

  $body = wp_remote_retrieve_body($response);
  if (!$body) {
    return false;
  }

  $known_hash = get_option('mshot_placeholder_md5');
  if (!$known_hash) {
    // ハッシュ未学習の間は判定できないため、完了扱いにはしない
    return false;
  }

  return md5($body) !== $known_hash;
}

/**
 * mshotsのサムネイルURLを含む情報を返す
 */
function get_url_thumbnail($post_id = null) {
  if (!$post_id) {
    $post_id = get_the_ID();
  }

  $data = [
    'thumbnail_url' => '',
    'width' => 0,
    'height' => 0,
  ];

  $url = get_field('url', $post_id); // カスタムフィールド名
  $data['width']  = 1000; // 生成するスクリーンショットの横幅
  $data['height'] = 628; // 生成するスクリーンショットの高さ

  if ($url) {
    $data['thumbnail_url'] = build_mshot_url($url, $data['width'], $data['height']);
  }

  return $data;
}

/**
 * 投稿保存時:URLが変わっていたら巡回対象として登録
 */
function sync_thumbnail_status($post_id) {
  if (wp_is_post_autosave($post_id) || wp_is_post_revision($post_id)) {
    return;
  }

  $url = get_field('url', $post_id);
  if (!$url) {
    return;
  }

  $prev_url = get_post_meta($post_id, '_mshot_source_url', true);

  if ($url === $prev_url && get_post_meta($post_id, '_mshot_ready', true) === '1') {
    return; // URL変更なし、生成確認済みなら何もしない
  }

  update_post_meta($post_id, '_mshot_source_url', $url);
  update_post_meta($post_id, '_mshot_ready', '0');
  delete_post_meta($post_id, '_mshot_attempts');

  // スクリーンショット生成を依頼
  wp_remote_get(build_mshot_url($url), [
    'blocking' => false,
    'timeout' => 1,
  ]);
}
add_action('save_post_works', 'sync_thumbnail_status');

/**
 * 2分間隔のスケジュールを登録
 */
add_filter('cron_schedules', function ($schedules) {
  $schedules['every_two_minutes'] = [
    'interval' => 120,
    'display' => __('2分ごと'),
  ];
  return $schedules;
});

/**
 * スクリーンショット未登録の場合は巡回cronを予約
 */
add_action('init', function () {
  if (!wp_next_scheduled('thumbnail_sweep')) {
    wp_schedule_event(time(), 'every_two_minutes', 'thumbnail_sweep');
  }
});

/**
 * 未完了の投稿をまとめてチェックし、生成が完了していればフラグを立てる巡回処理
 */
function sweep_thumbnails() {
  $query = new WP_Query([
    'post_type' => 'works', // 投稿タイプ名
    'post_status' => 'any',
    'posts_per_page' => 5, // 1回の巡回で処理する件数(負荷対策)
    'fields' => 'ids',
    'meta_query' => [
      [
        'key' => '_mshot_ready',
        'value' => '1',
        'compare' => '!=',
      ],
      [
        'key' => '_mshot_source_url',
        'compare' => 'EXISTS',
      ],
    ],
  ]);

  foreach ($query->posts as $post_id) {
    $url = get_post_meta($post_id, '_mshot_source_url', true);
    if (!$url) {
      continue;
    }

    $attempts = (int) get_post_meta($post_id, '_mshot_attempts', true);
    if ($attempts >= 20) {
      continue; // 20回試して駄目なら諦める
    }

    if (check_mshot_completed(build_mshot_url($url), 10)) {
      update_post_meta($post_id, '_mshot_ready', '1');
      delete_post_meta($post_id, '_mshot_attempts');
    } else {
      update_post_meta($post_id, '_mshot_attempts', $attempts + 1);
    }
  }
}
add_action('thumbnail_sweep', 'sweep_thumbnails');
仕組みとしては、投稿保存時に新規投稿もしくはURLが変わっていたら、mshotsのURLに対してHTTPリクエストを送ることで、スクリーンショットの生成を促しています。
さらに、スクリーンショットがまだ生成されていない投稿をチェックして、生成されていなければHTTPリクエストを送っています。この処理はWP-Cronを使ってスケジュールしているため、サイトへのアクセスがトリガーとなって動きます。
あとがき
スクリーンショットの生成自体は非常に簡単に実装できますね。ページへのアクセスなしで自動取得しようとすると少々ややこしくなりますが…
URLからスクリーンショットを取得したいケースってあまりないかもしれませんが、参考になれば幸いです。


コメントを残す