
WordPress5.0から導入された新しいエディタ「Gutenberg(ブロックエディタ)」ですが、慣れると非常に便利で使い勝手が良いです。一度慣れてしまうと旧エディタには戻れないですね。
Gutenbergで記事を書く際、編集画面の見出しや本文にはGutenberg用のデフォルトスタイルが当たっています。すごく見にくいわけではないですが、なるべく実際にブログを表示した時に近い状態で編集したいと思う方は多いのではないでしょうか。
そんなわけで今回は、Gutenbergの編集画面に独自のスタイル(CSS)を適用する方法をご紹介したいと思います。この方法を使えば、実際の表示と同じような見た目で記事を編集することができるようになります。
Gutenbergの編集画面に独自のスタイルを適用する方法
Gutenbergの編集画面に独自のスタイルを適用する方法は、2通りの方法がありますので、それぞれご紹介いたします。
パターン1. after_setup_themeで独自スタイル用のCSSを読み込む
1つ目の方法は、after_setup_themeフックにCSSファイルの読み込みを追記するやり方です。functions.phpに以下を追記します。
function gutenberg_support_setup() {
  add_theme_support( 'editor-styles' );
  add_editor_style( 'editor-style.css' );
}
add_action( 'after_setup_theme', 'gutenberg_support_setup' );
after_setup_themeは、以前”Gutenbergの「幅広」と「全幅」に対応させる方法“という記事で紹介していますが、すでにafter_setup_themeフックを使った記述がある場合は、そこに「add_theme_support( ‘editor-styles’ );」と「add_editor_style( ‘editor-style.css’ );」を追加してあげればOKです。
function gutenberg_support_setup() {

  //Gutenberg用スタイルの読み込み
  add_theme_support( 'wp-block-styles' );

  //「幅広」と「全幅」に対応
  add_theme_support( 'align-wide' );

  //独自スタイルの適用
  add_theme_support( 'editor-styles' );
  add_editor_style( 'editor-style.css' );

}
add_action( 'after_setup_theme', 'gutenberg_support_setup' );
functions.phpにCSSファイル読み込み用のコードを追加したら、「editor-style.css」を作成してテーマディレクトリ直下にアップロードします。
editor-style.cssの中身は、以下のように記述します。特にクラスを指定する必要はありません。
body {
  background: #ccc;
}

h2 {
  background: #fff;
  padding: 0.3em;
}
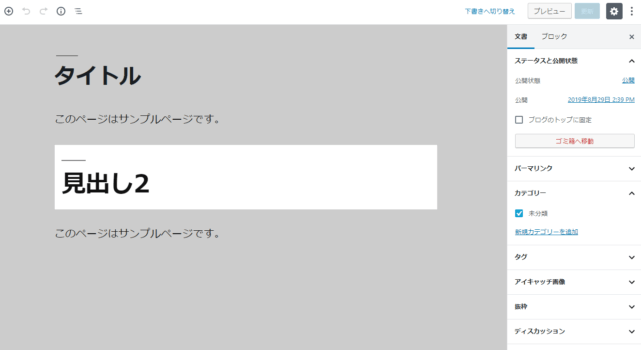
上述した内容を適用すると、以下のように背景と見出しにスタイルが適用されます。
なお、エディタ内のコンテンツ部分の横幅を変更したい場合は、以下のように.wp-blockの最大横幅を変更します。
.wp-block {
  max-width: 610px;
}
パターン2. enqueue_block_editor_assetsで独自スタイル用のCSSを読み込む
2つ目の方法は、enqueue_block_editor_assetsフックでCSSファイルを読み込むやり方です。
functions.phpに以下を追加することで、編集画面でeditor-style.cssが読み込まれるようになります。
function add_gutenberg_editor_style() {
  wp_enqueue_style( 'block-editor-style', get_theme_file_uri( 'editor-style.css' ) );
}
add_action( 'enqueue_block_editor_assets', 'add_gutenberg_editor_style' );
続いて、editor-style.cssを作成してテーマディレクトリ直下にアップロードします。
editor-style.cssの中身は以下のようにします。エディタには.editor-styles-wrapperというクラスが付いているので、.editor-styles-wrapperを使ってスタイルを適用します。
.editor-styles-wrapper {
  background: #ccc;
}

.editor-styles-wrapper h2 {
  background: #fff;
  padding: 0.3em;
}
なお、エディタ内のコンテンツ部分の横幅を変更したい場合、パターン1とは違って細かい調整が必要です。
.editor-styles-wrapper .editor-writing-flow {
  width: 610px;
  max-width: 100% !important;
}

.editor-styles-wrapper .wp-block {
  width: 100% !important;
}

.editor-styles-wrapper .editor-post-title {
  padding: 0;
}

.editor-styles-wrapper .block-editor-block-list__layout {
  padding: 0;
}
他の部分を変更したい場合は、ブラウザのデベロッパーツールを使って該当箇所のクラスを確認しながら変更していきましょう。
あとがき
いちいち.editor-styles-wrapperを追加しなくて良いので、パターン1のやり方がわかりやすいですね。
どちらの方法でも、編集画面に独自のスタイルを適用することができるので、状況に合わせて使い分けてください。
ちなみに、旧エディタで独自のスタイルを適用したい場合は、functions.phpに以下を追記します。
add_editor_style('editor-style.css');
その上で、editor-style.cssをテーマディレクトリ直下にアップロードします。editor-style.cssの中身は以下のような感じです。
body.mceContentBody {
  background: #ccc;
}

.editor-area h2 {
  background: #fff;
  padding: 0.3em;
}


コメントを残す