
EC-CUBEの商品詳細ページに、オリジナルの項目を追加する方法をご紹介いたします。商品登録画面に入力欄を追加して、入力した内容を詳細ページで表示させます。
なお、今回検証した環境は、EC-CUBE2.13.3です。
ステップ1. データベースへ列を追加
まずは、データベースに追加する項目用の列を追加してあげます。
phpMyAdminで「dtb_products」を開いて[構造]タブを選択します。最下部に「○個のカラムを追加する」という項目があるので、「指定カラムの後に」にチェックを入れ、任意のカラムを選択します。
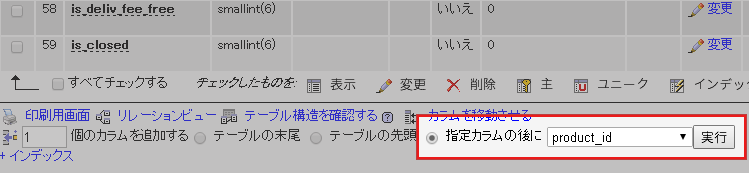
[実行]をクリックすると列の追加画面が表示されるので、「名前」に任意の名前(recipeなど)を入れ、「データ型」でTEXTを選択します。[保存]をクリックすると列が追加されます。
商品詳細ページに追加したい項目の数だけ、上記手順で列を追加してください。
今回実施した環境では、recipe_nameとrecipe_linkという列を追加しました。
ステップ2. ファイルのカスタマイズ
続いて、ファイルをカスタマイズしていきます。変更が必要なファイルは以下の通りです。
- /data/class/SC_Product.php
- /data/class/pages/admin/products/LC_Page_Admin_Products_Product.php
- /data/Smarty/templates/admin/products/product.tpl
- /data/Smarty/templates/admin/products/confirm.tpl
- /data/Smarty/templates/default/products/detail.tpl
/data/class/SC_Product.php
SC_Product.phpは、120行目くらいに以下のような箇所があります。
public function lists(&$objQuery)
 {
 $col = <<< __EOS__ product_id ,product_code_min ,product_code_max ,name ,comment1 ,comment2 ,comment3 ,main_list_comment ,main_image ,main_list_image ,price01_min ,price01_max ,price02_min ,price02_max ,stock_min ,stock_max ,stock_unlimited_min ,stock_unlimited_max ,deliv_date_id ,status ,del_flg ,update_date ,recipe_name //項目追加 ,recipe_link //項目追加 __EOS__; $res = $objQuery->select($col, $this->alldtlSQL());

 return $res;
 }
ここに項目を追加します。上記例では、「update_date」の後ろに追加しています。
/data/class/pages/admin/products/LC_Page_Admin_Products_Product.php
LC_Page_Admin_Products_Product.phpは何箇所か変更する場所があります。
まず320行目辺りです。
$objFormParam->addParam('save_main_large_image', 'save_main_large_image', '', '', array());
$objFormParam->addParam('temp_main_list_image', 'temp_main_list_image', '', '', array());
$objFormParam->addParam('temp_main_image', 'temp_main_image', '', '', array());
$objFormParam->addParam('temp_main_large_image', 'temp_main_large_image', '', '', array());
$objFormParam->addParam('レシピ名', 'recipe_name', MTEXT_LEN, 'KVa', array('SPTAB_CHECK', 'MAX_LENGTH_CHECK')); //項目追加
$objFormParam->addParam('レシピリンク', 'recipe_link', MTEXT_LEN, 'KVa', array('SPTAB_CHECK', 'MAX_LENGTH_CHECK')); //項目追加
「レシピ名」「レシピリンク」「recipe_name」「recipe_link」の部分は適宜変更してください。
次は1000行目付近です。
public function lfRegistProduct(&$objUpFile, &$objDownFile, $arrList)
{
$objQuery =& SC_Query_Ex::getSingletonInstance();
$objDb = new SC_Helper_DB_Ex();

// 配列の添字を定義
$checkArray = array('name', 'status',
'main_list_comment', 'main_comment',
'deliv_fee', 'comment1', 'comment2', 'comment3',
'comment4', 'comment5', 'comment6',
'sale_limit', 'deliv_date_id', 'maker_id', 'note', 'recipe_name', 'recipe_link');
$arrList = SC_Utils_Ex::arrayDefineIndexes($arrList, $checkArray);
配列の中に項目を追加します。
上記の少し下にいくと、以下のようなコードが並んでいます。
$sqlval['main_comment'] = $arrList['main_comment'];
$sqlval['comment1'] = $arrList['comment1'];
$sqlval['comment2'] = $arrList['comment2'];
$sqlval['comment3'] = $arrList['comment3'];
$sqlval['comment4'] = $arrList['comment4'];
$sqlval['comment5'] = $arrList['comment5'];
$sqlval['comment6'] = $arrList['comment6'];
$sqlval['recipe_name'] = $arrList['recipe_name']; //項目追加
$sqlval['recipe_link'] = $arrList['recipe_link']; //項目追加
同じ要領で追加してあげましょう。
/data/Smarty/templates/admin/products/product.tpl
product.tplでは、管理画面上に入力欄を追加します。
400行目付近に入力欄を表示している箇所があります。
<tr>
 <!--{assign var=key value="main_large_image"}-->
<th>詳細-商品画像
[<!--{$smarty.const.LARGE_IMAGE_WIDTH}-->×<!--{$smarty.const.LARGE_IMAGE_HEIGHT}-->]</th>
<td>
 <span class="attention"><!--{$arrErr[$key]}--></span>
 <!--{if $arrForm.arrFile[$key].filepath != ""}-->
 <img src="<!--{$arrForm.arrFile[$key].filepath}-->" alt="<!--{$arrForm.name|h}-->" /> <a href="" onclick="selectAll('category_id'); eccube.setModeAndSubmit('delete_image', 'image_key', '<!--{$key}-->'); return false;">[画像の取り消し]</a>
 <!--{/if}-->
 <input type="file" name="<!--{$key}-->" size="40" style="<!--{$arrErr[$key]|sfGetErrorColor}-->" />
 <a class="btn-normal" href="javascript:;" name="btn" onclick="selectAll('category_id'); eccube.setModeAndSubmit('upload_image', 'image_key', '<!--{$key}-->'); return false;">アップロード</a>
 </td>
</tr>
同じように追加する項目の記述をします。
<tr>
<th>レシピ名</th>
<td>
 <span class="attention"><!--{$arrErr.recipe_name}--></span>
 <input type="text" name="recipe_name" value="<!--{$arrForm.recipe_name|h}-->" maxlength="<!--{$smarty.const.URL_LEN}-->" size="60" class="box60" style="<!--{$arrErr.recipe_name|sfGetErrorColor}-->" />
 <span class="attention"> (上限<!--{$smarty.const.MTEXT_LEN}-->文字)</span>
 </td>
</tr>

<tr>
<th>レシピリンク</th>
<td>
 <span class="attention"><!--{$arrErr.recipe_link}--></span>
 <input type="text" name="recipe_link" value="<!--{$arrForm.recipe_link|h}-->" maxlength="<!--{$smarty.const.URL_LEN}-->" size="60" class="box60" style="<!--{$arrErr.recipe_link|sfGetErrorColor}-->" />
 <span class="attention"> (上限<!--{$smarty.const.MTEXT_LEN}-->文字)</span>
 </td>
</tr>
recipe_nameとrecipe_linkとなっている部分を変更してください。
/data/Smarty/templates/admin/products/confirm.tpl
confirm.tplは、商品登録時の確認画面です。
300行目付近に項目が並んでいる箇所があるので、product.tplと同じように項目を追加します。
<tr>
<th>レシピ名</th>
<td>
 <!--{$arrForm.recipe_name|h}-->
 </td>
</tr>
<tr>
<th>レシピリンク</th>
<td>
 <!--{$arrForm.recipe_link|h}-->
 </td>
</tr>
ここまでできたら、商品登録画面には項目が追加されています。
![]()
/data/Smarty/templates/default/products/detail.tpl
detail.tplは、商品詳細ページの表示です。表示する場所は好きなところにしましょう。
<tr>
<th>おすすめレシピ</th>
<td>
 <!--{if $arrProduct.recipe_name|strlen >= 1}-->
 <a href="<!--{$arrProduct.recipe_link|h}-->" target="_blank"><!--{$arrProduct.recipe_name|h}--></a>
 <!--{/if}-->
 </td>
</tr>
今回は、上記のようにしました。
「<!–{$arrProduct.recipe_name|h}–>」がrecipe_nameを出力、「<!–{$arrProduct.recipe_link|h}–>」がrecipe_linkを出力します。
あとがき
2つ項目を追加するだけでも結構大変ですね。参考になれば幸いです。


コメントを残す