Media Cleanerは、メディアライブラリをスキャンして、投稿やウィジェット内で一切使われていない画像を検出してくれるWordPressプラグインです。
不要な画像をチェックして、メディアライブラリ内を整理することができます。
Media Cleanerのインストール
インストール手順は以下の通りです。
- Media Cleanerをダウンロードします。
- ダウンロードしたファイルを展開し wp-content/plugins にアップロードします。
- 管理画面の[プラグイン]ページで、Media Cleanerを有効化します。
Media Cleanerの設定
WordPress管理画面で[Meow Apps] – [Media Cleaner]にアクセスし、下記の項目を設定します。

SCANNING
| Method | スキャン対象 |
| Content | 投稿やウィジェットなどコンテンツでのチェック |
| Logs | ログの保存 |
UI
| Thumbnails | サムネイルの非表示 |
| Warning Message | 警告メッセージの非表示 |
| Results Per Page | スキャン結果の表示件数 |
FILTERS
| Thumbnails Only | サムネイルのみの表示 |
| Directories Filter | フォルダの絞り込み(正規表現) |
| Files Filter | ファイルの絞り込み(正規表現) |
ADVANCED
| Medias Buffer | 1度に読み込むメディアの数 |
| Posts Buffer | 1度に読み込む投稿の数 |
| Analysis Buffer | 1度に読み込むファイルの数 |
| Delay | スキャンの間隔 |
Media Cleanerを使うための事前準備
[メディア] – [Cleaner]にアクセスします。最初は以下のようなメッセージが表示されるかと思います。
The database is not ready for Media Cleaner. The scan will not work. Click on the Reset button, it re-creates the tables required by Media Cleaner. If this message still appear, contact the support.
Media Cleanerを使うためのデータベースの準備ができていない旨のメッセージなので、[Reset]をクリックしてデータベースの準備をします。

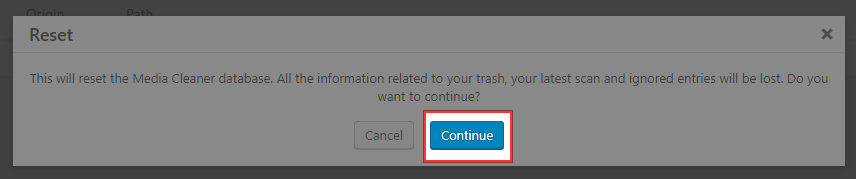
[Reset]をクリックすると、以下のようなポップアップが表示されるので、[Continue]をクリックしてください。
データベースの準備ができたら、次は以下のようなメッセージが表示されます。

1つ目のメッセージは、「Media Cleanerで画像を削除する前にバックアップを取りましょう」という内容です。
Important. Backup your DB and your /uploads directory before using Media Cleaner. The deleted files will be temporarily moved to the uploads/wpmc-trash directory. After testing your website, you can check the trash to either empty it or recover the media and files. The Media Cleaner does its best to be safe to use. However, WordPress being a very dynamic and pluggable system, it is impossible to predict all the situations in which your files are used. Again, please backup! If you don’t know how, give a try to this: BlogVault.
Be thoughtful. Don’t blame Media Cleaner if it deleted too many or not enough of your files. It makes cleaning possible and this task is only possible this way; don’t post a bad review because it broke your install. If you have a proper backup, there is no risk. Sorry for the lengthy message, but better be safe than sorry. You can disable this big warning in the options if you have a Pro license. Make sure you read this warning twice. Media Cleaner is awesome and always getting better so I hope you will enjoy it. Thank you :)
2つ目のメッセージは、「メディアライブラリのごみ箱機能がオフなので、削除を実行するとすぐに完全削除されます」という内容です。ごみ箱機能を有効化するには、wp-config.phpに「define( ‘MEDIA_TRASH’, true );」を追加します。
The trash for the Media Library is disabled. Any media removed by the plugin will be permanently deleted. To enable it, modify your wp-config.php file and add this line (preferably at the top): define( ‘MEDIA_TRASH’, true );
Media Cleanerの使い方
[メディア] – [Cleaner]で[Start Scan]をクリックします。
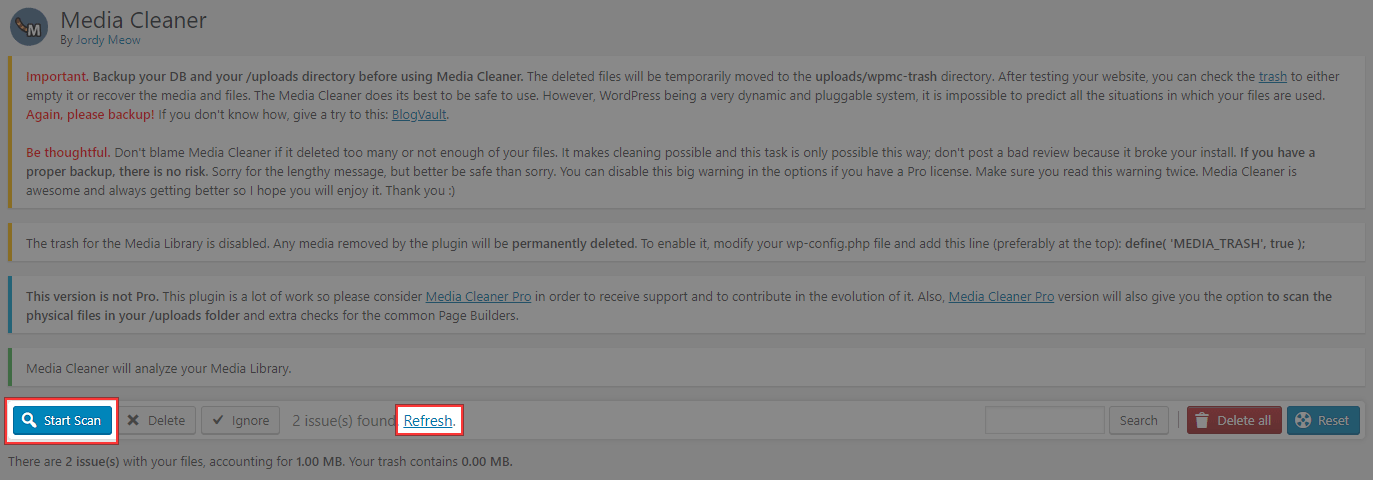
[Refresh]をクリックすると、使用されていないメディアの一覧が表示されます。

削除したい画像にチェックを入れて、[Delete]をクリックするとファイルが削除されます。
あとがき
使われていない画像を手動で探すのは一苦労なので、メディアライブラリ内のファイルを整理したい時はぜひ活用しましょう。

コメントを残す